Kubernetes - Overview and Introduction to Pods
In this section we give an overview of the Kubernetes system and introduce the first major Kubernetes abstraction, the Pod.
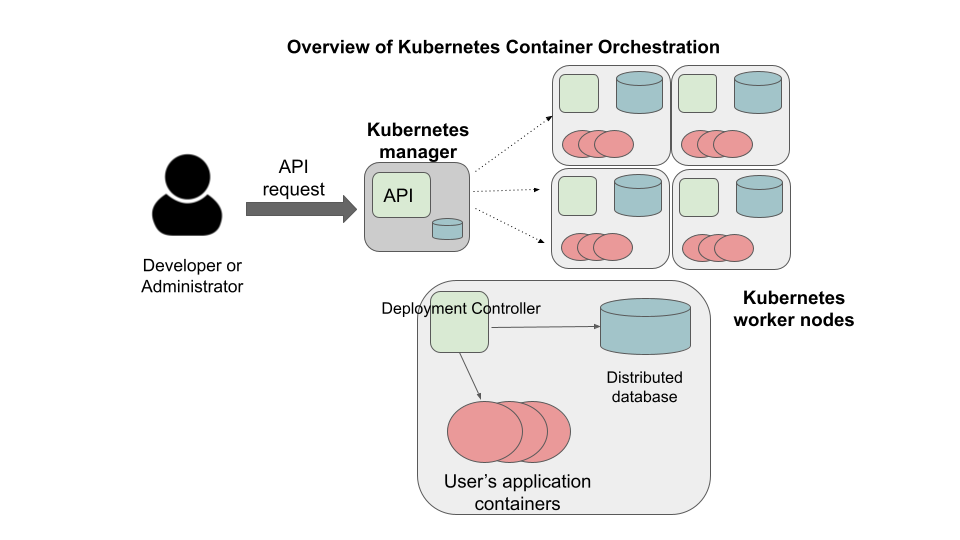
Kubernetes Overview
Kubernetes (k8s) is itself a distributed system of software components that run a cluster of one or more machines (physical computers or virtual machines). Each machine in a k8s cluster is either a “manager” or a “worker” node.
Users communicate with k8s by making requests to its API. The following steps outline how Kubernetes works at a high level:
Requests to k8s API describe the user’s desired state on the cluster; for example, the desire that 3 containers of a certain image are running.
The k8s API schedules new containers to run on one or more worker nodes.
After the containers are started, the Kubernetes deployment controller, installed on each worker node, monitors the containers on the node.
The k8s components, including the API and the deployment controllers, maintain both the desired state and the actual state in a distributed database. The components continuously coordinate together to make the actual state converge to the desired state.
Note
It is important to note that most of the time, the k8s API as well as the worker nodes are running on separate machines from the machine we use to interact with k8s (i.e., make API requests to it). The machine we use to interact with k8s only needs to have the k8s client tools installed, and in fact, as the k9s API is available over HTTP, we don’t strictly speaking require the tools – we could use curl or some other http client – but the tools make interacting much easier.
Connecting to the TACC Kubernetes Instance
In this class, we will use TACC’s FreeTail Kubernetes cluster for deploying our applications. To simplify the process of using FreeTail, we have enabled connectivity to it from the ips02 host. Therefore, any time you want to work with k8s, simply SSH to isp02 with your TACC username as you have throughout the semester:
$ ssh <tacc_username>@isp02.tacc.utexas.edu
You will be prompted for your TACC username and password, just as you are when connecting to isp02.
First Commands with k8s
We will use the Kubernetes Command Line Interface (CLI) referred to as “kubectl” (pronounced “Kube control”) to make
requests to the Kubernetes API. We could use any HTTP client, including a command-line client such as curl, but kubectl
simplifies the process of formatting requests.
The kubectl software should already be installed and configured to use the Freetail K8s cluster. Let’s verify that
is the case by running the following:
$ kubectl version -o yaml
You should see output similar to the following:
clientVersion:
  buildDate: "2021-01-13T13:28:09Z"
  compiler: gc
  gitCommit: faecb196815e248d3ecfb03c680a4507229c2a56
  gitTreeState: clean
  gitVersion: v1.20.2
  goVersion: go1.15.5
  major: "1"
  minor: "20"
  platform: linux/amd64
serverVersion:
  buildDate: "2020-11-11T13:09:17Z"
  compiler: gc
  gitCommit: d360454c9bcd1634cf4cc52d1867af5491dc9c5f
  gitTreeState: clean
  gitVersion: v1.19.4
  goVersion: go1.15.2
  major: "1"
  minor: "19"
  platform: linux/amd64
This command made an API request to the TACC Freetail k8s cluster and returned information about the version
of k8s running there (under serverVersion) as well as the version of the kubectl that we are running (under
clientVersion).
Note
The output of the kubectl command was yaml because we used the -o yaml flag. We could have asked for the output
to be formatted in json with -o json. The -o flag is widely available on kubectl commands.
Introduction to Pods
Pods are a fundamental abstraction within Kubernetes and are the most basic unit of computing that can be deployed onto the cluster. A pod can be thought of as generalizing the notion of a container: a pod contains one or more containers that are tightly coupled and need to be scheduled together, on the same computer, with access to a shared file system and a shared network address.
Note
By far, the majority pods you will meet in the wild, including the ones used in this course, will only include one container. A pod with multiple containers can be thought of as an “advanced” use case.
Hello, Kubernetes
To begin, we will define a pod with one container. As we will do with all the resources we want to create in k8s, we will describe our pod in a yaml file.
Create a file called pod-basic.yml, open it up in an editor and paste the following code in:
---
apiVersion: v1
kind: Pod
metadata:
  name: hello
spec:
  containers:
    - name: hello
      image: ubuntu:18.04
      command: ['sh', '-c', 'echo "Hello, Kubernetes!" && sleep 3600']
Let’s break this down. The top four attributes are common to all k8s resource descriptions:
apiVersion– describes what version of the k8s API we are working in. We are usingv1.
kind– tells k8s what kind of resource we are describing, in this case aPod.
metadata– in general, this is additional information about the resource we are describing that doesn’t pertain to its operation. Here, we are giving our pod aname,hello.
spec– This is where the actual description of the resource begins. The contents of this stanza vary depending on thekindof resource you are creating. We go into more details on this in the next section.
Warning
Only one Kubernetes object of a specific kind can have a given name at a time. If you define a second pod
with the same name you will overwrite the first pod. This is true of all the different types of k8s objects we will
be creating.
The Pod Spec
In k8s, you describe resources you want to create or update using a spec. The required and optional parameters
available depend on the kind of resource you are describing.
The pod spec we defined looked like this:
spec:
  containers:
    - name: hello
      image: ubuntu:18.04
      command: ['sh', '-c', 'echo "Hello, Kubernetes!" && sleep 3600']
There is just one stanza, the containers stanza, which is a list of containers (recall that pods can contain
multiple containers). Here we are defining just one container. For each container, we provide:
name(optional) – this is the name of the container, similar to the name attribute in Docker.
image(required) – the image we want to use for the container, just like with Docker.
command(optional) – the command we want to run in the container. Here we are running a short BASH script.
Creating the Pod In K8s
We are now ready to create our pod in k8s. To do so, we use the kubectl apply command. In general, when you have
a description of a resource that you want to create or update in k8s, the kubectl apply command can be used.
In this case, our description is contained in a file, so we use the -f flag. Try this now:
$ kubectl apply -f pod-basic.yml
If all went well and k8s accepted your request, you should see an output like this:
pod/hello created
In practice, we won’t be creating many Pod resources directly – we’ll be creating other resources, such as
deployments that are made up of pods – but it is important to understand pods and to be able to work
with pods using kubectl for debugging and other management tasks.
Note
The pod we just created is running on the FreeTail k8s cluster, NOT on isp02. You will not be able to find it using commands like docker ps, etc.
Working With Pods
We can use additional kubectl commands to get information about the pods we run on k8s.
Listing Pods
For example, we can list the pods on the cluster with kubectl get <object_type> – in this case, the object type
is “pods”:
$ kubectl get pods

  NAME                             READY   STATUS    RESTARTS   AGE
  ds-staging-6df657fbd-tbht5       1/1     Running   0          34d
  elasticsearch-748f666f4f-svf2h   1/1     Running   0          76d
  hello                            1/1     Running   0          3s
  kibana-f5b79569f-r4pl6           1/1     Running   0          78d
  sidecartest-5454b7d49b-q8fvw     3/3     Running   472        78d
The output is fairly self-explanatory. We see a line for every pod which includes its name, status, the number of times
it has been restarted and its age. Our hello pod is listed above, with an age of 3s because we just started it
but it is already RUNNING. Several additional pods are listed in my output above due to prior work sessions.
A Word on Authentication and Namespaces
With all the students running their own pods on the same k8s cluster, you might be wondering why you only see your
pod or why you don’t see my pods? The reason is that when you make an API request to k8s, you tell the API who you
are and what namespace you want to make the request in. Namespaces in k8s are logically isolated views or partitions
of the k8s objects. Your kubectl client is configured to make requests in a namespace that is private to you; we set
these namespaces up for COE 332.
Getting and Describing Pods
We can pass the pod name to the get command – i.e., kubectl get pods <pod_name> – to just get information on
a single pod
$ kubectl get pods hello
  NAME    READY   STATUS    RESTARTS   AGE
  hello   1/1     Running   0          3m1s
The -o wide flag can be used to get more information:
$ kubectl get pods hello -o wide
  NAME    READY   STATUS    RESTARTS   AGE    IP            NODE   NOMINATED NODE   READINESS GATES
  hello   1/1     Running   0          3m1s   10.244.5.28   c04    <none>           <none>
Finally, the kubectl describe <resource_type> <resource_name> command gives additional information, including the
k8s events at the bottom. While we won’t go into the details now, this information can be helpful when troubleshooting
a pod that has failed:
$ kubectl describe pods hello
  Name:         hello
  Namespace:    designsafe-jupyter-stage
  Priority:     0
  Node:         c04/172.16.120.11
  Start Time:   Fri, 26 Feb 2021 10:12:43 -0600
  Labels:       <none>
  Annotations:  <none>
  Status:       Running
  IP:           10.244.5.28
  IPs:
    IP:  10.244.5.28
  Containers:
    hello:
      Container ID:  containerd://b0e2d0eb8dc7717567886c99cfb30b9245c99f2b2f3a6610d5d6fe24fe8866b8
      Image:         ubuntu:18.04
      Image ID:      docker.io/library/ubuntu:18.04@sha256:c6b45a95f932202dbb27c31333c4789f45184a744060f6e569cc9d2bf1b9ad6f
      Port:          <none>
      Host Port:     <none>
      Command:
        sh
        -c
        echo "Hello, Kubernetes!" && sleep 3600
      State:          Running
        Started:      Mon, 01 Mar 2021 11:14:38 -0600
      Last State:     Terminated
        Reason:       Completed
        Exit Code:    0
        Started:      Mon, 01 Mar 2021 10:14:37 -0600
        Finished:     Mon, 01 Mar 2021 11:14:37 -0600
      Ready:          True
      Restart Count:  73
      Environment:    <none>
      Mounts:
        /var/run/secrets/kubernetes.io/serviceaccount from default-token-xpg9m (ro)
  Conditions:
    Type              Status
    Initialized       True
    Ready             True
    ContainersReady   True
    PodScheduled      True
  Volumes:
    default-token-xpg9m:
      Type:        Secret (a volume populated by a Secret)
      SecretName:  default-token-xpg9m
      Optional:    false
  QoS Class:       BestEffort
  Node-Selectors:  <none>
  Tolerations:     node.kubernetes.io/not-ready:NoExecute op=Exists for 300s
                   node.kubernetes.io/unreachable:NoExecute op=Exists for 300s
  Events:
    Type    Reason   Age                    From     Message
    ----    ------   ----                   ----     -------
    Normal  Pulling  9m32s (x74 over 3d1h)  kubelet  Pulling image "ubuntu:18.04"
    Normal  Created  9m31s (x74 over 3d1h)  kubelet  Created container hello
    Normal  Started  9m31s (x74 over 3d1h)  kubelet  Started container hello
    Normal  Pulled   9m31s                  kubelet  Successfully pulled image "ubuntu:18.04" in 601.12516ms
Getting Pod Logs
Finally, we can use kubectl logs <pod_name> command to get the logs associated with a pod:
$ kubectl logs hello
  Hello, Kubernetes!
Note that the logs command does not include the resource name (“pods”) because it only can be applied to pods. The
logs command in k8s is equivalent to that in Docker; it returns the standard output (stdout) of the container.
Using Labels
In the pod above we used the metadata stanza to give our pod a name. We can use labels to add additional metadata
to a pod. A label in k8s is nothing more than a name: value pair that users create to organize objects and add
meaningful to the user. We can choose any value for name and value that we wish but they must be strings. If you
want to use a number like “10” for a label name or value, be sure to enclose it in quotes (i.e., 10).
You can think of these name:value
pairs as variables and values. So for example, you might a label called shape with values circle, triangle,
square, etc. Multiple pods can have the same name:value label.
Let’s use the pod definition above to create a new pod with a label.
Create a file called pod-label.yml, open it up in an editor and paste the following code in:
---
apiVersion: v1
kind: Pod
metadata:
  name: hello-label
  labels:
    version: "1.0"
spec:
  containers:
    - name: hello
      image: ubuntu:18.04
      command: ['sh', '-c', 'echo "Hello, Kubernetes!" && sleep 3600']
Let’s create this pod using kubectl apply:
$ kubectl apply -f pod-label.yml
pod/hello-label created
Now when we list our pods, we should see it
$ kubectl get pods
  NAME                             READY   STATUS    RESTARTS   AGE
  ds-staging-6df657fbd-tbht5       1/1     Running   0          34d
  elasticsearch-748f666f4f-svf2h   1/1     Running   0          76d
  hello                            1/1     Running   0          4m
  hello-label                      1/1     Running   0          4s
  kibana-f5b79569f-r4pl6           1/1     Running   0          78d
  sidecartest-5454b7d49b-q8fvw     3/3     Running   472        78d
Filtering By Labels With Selectors
Labels are useful because we can use selectors to filter our results for a given label name and value. To specify
a label name and value, use the following syntax: --selector "<label_name>=<label_value>".
For instance, we can search for pods with the version 1.0 label like so:
$ kubectl get pods  --selector "version=1.0"
  NAME          READY   STATUS    RESTARTS   AGE
  hello-label   1/1     Running   0          4m58s
We can also just use the label name to filter with the syntax --selector "<label_name>". This will find any pods with
the label <label_name>, regardless of the value.